To change a tire, park on a level surface, turn on hazard lights, and apply the parking brake. Loosen the lug nuts, lift the car with a jack, remove the flat tire, and install the spare. Lower the vehicle and tighten the lug nuts in a star pattern. Always check the spare tire pressure before driving.
Introduction
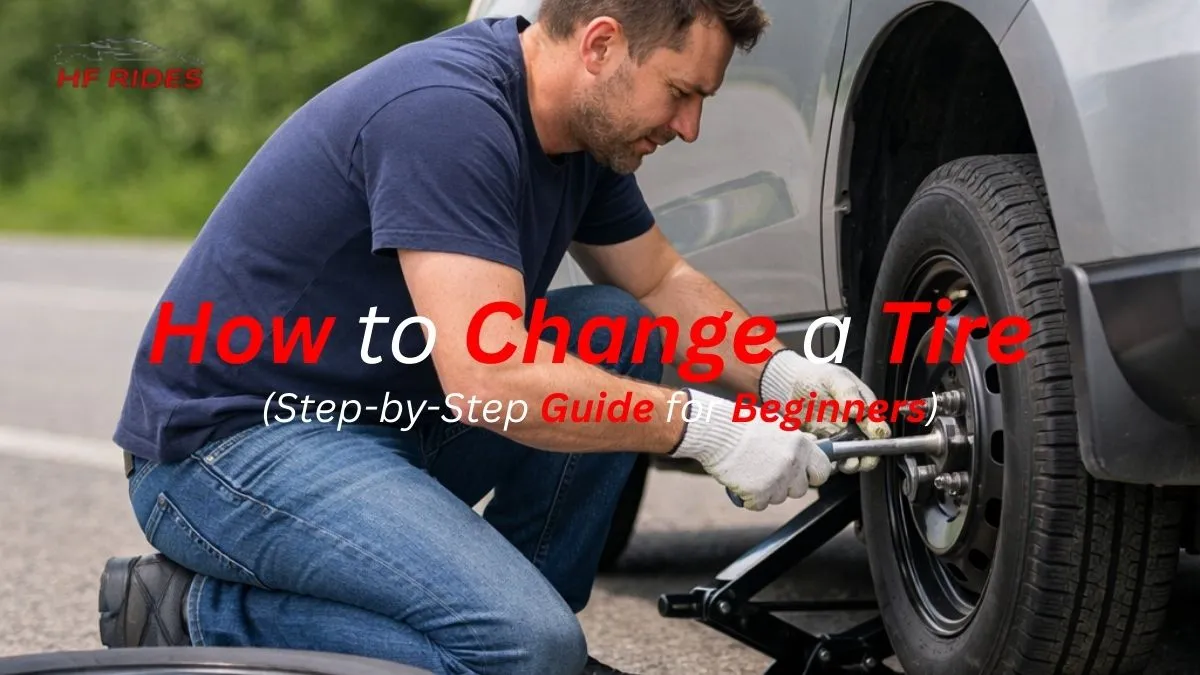
Changing a tire may seem intimidating, but knowing how to change a tire is an essential skill for every driver. Whether you’re dealing with a flat tire on the road, replacing a worn-out tire, or doing a seasonal tire swap, having the confidence to handle it yourself can save time and stress.
This step-by-step tire change guide will walk you through the entire process safely and efficiently. From preparing your vehicle and using the right tools to installing a spare tire correctly, you’ll learn everything needed for a smooth, safe tire change experience.
Tools and Equipment You’ll Need
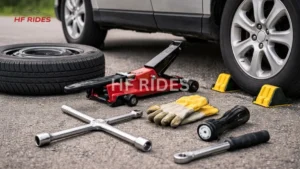
Before you start, make sure you have all the necessary tools for a smooth tire change. The basics include a spare tire, jack, and lug wrench. These are essential to safely lift your vehicle and remove the flat tire.
In addition, keep wheel wedges or chocks, gloves, and a flashlight handy. These small items make a big difference, especially when changing a tire on the roadside or in low-light conditions.
A torque wrench is also very helpful to tighten lug nuts to the proper specification. Your vehicle owner’s manual is useful too, as it provides specific guidance for your car model.
Having all these tools ready makes changing a tire faster, safer, and much more efficient, giving you confidence whether you’re on the road or at home.
Safety First — Preparing Your Vehicle
Before learning how to change a tire on a car, safety preparation is critical. Start by pulling your car over to a safe, level location away from traffic. Turn on your hazard lights and engage the parking brake to prevent any movement. Being aware of the tire weight also helps you prepare properly before lifting or removing the wheel.
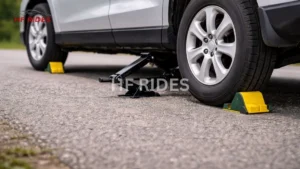
Place wheel wedges or chocks behind or in front of the tires for extra security. Make sure you’re wearing gloves and have a flashlight if it’s dark. Taking these precautions ensures that your tire change is not only effective but also safe for you and others around your vehicle.
Always double-check that your car is stable before lifting it, and never rush through the safety steps—even if you’re in a hurry. Proper preparation protects both you and your vehicle.
Reports highlight that many accidents during roadside tire changes happen because drivers skip these basic safety steps. Incorrect jack placement or forgetting wheel chocks can lead to vehicle movement, which is dangerous. Spending a few extra minutes on proper setup makes the tire change much smoother and keeps you completely safe.
Step-by-Step Instructions to Change a Tire
Changing a tire on a car is simple when done step by step. Whether you’re learning how to change a tire or specifically how to change a tire on a car, these steps apply to most sedans, hatchbacks, and compact vehicles.
-
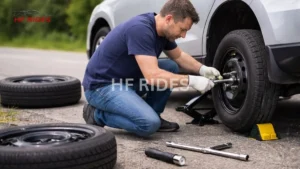
Loosen the lug nuts while the car is still on the ground. This prevents the wheel from spinning while you try to remove it later.
-
Place the jack at the manufacturer-recommended lifting point and lift the vehicle until the flat tire is off the ground. Always ensure the car is on a level surface and stabilized with wheel wedges.
-
Remove the lug nuts completely and carefully take off the flat tire. Handle it with care to avoid injury or damage to the wheel.
-
Mount the spare tire onto the wheel hub and hand-tighten the lug nuts. Lower the vehicle slowly and steadily to the ground.
-
Tighten the lug nuts in a star pattern using a lug wrench or torque wrench. This ensures the wheel is evenly secured and prevents wobbling while driving.
Always double-check that everything is secure before driving. Taking your time during these steps ensures a smooth, safe, and stress-free tire change, whether it’s on the road or at home.
Aftercare and Follow-Up
Once the tire is changed, it’s important to perform a few checks to ensure safety. Start by checking the spare tire pressure and adjusting it if needed. Proper pressure is essential for handling and stability, especially if you’re using a temporary spare.
Remove any wheel wedges or chocks, and ensure all lug nuts are fully tightened. A quick double-check can prevent problems like loose wheels or vibrations while driving.
Drive cautiously for the first few miles, particularly if your spare tire is a temporary one. Avoid high speeds and sharp turns until you reach a safe location or tire shop.
Schedule a visit to a tire shop to replace or repair the flat tire as soon as possible. This ensures your vehicle is fully prepared for regular driving conditions.
Proper aftercare helps your spare tire last longer, keeps your vehicle safe, and ensures you’re prepared for any future roadside emergencies.
Taking a few extra minutes after a tire change can prevent unexpected issues on the road. A quick recheck of lug nuts and spare tire pressure helps ensure safer and more reliable driving.
Common Mistakes to Avoid
When changing a tire, avoiding mistakes is just as important as following the steps correctly. One of the most common errors is over-tightening or under-tightening lug nuts. Too tight can damage the wheel or threads, and too loose can make it unsafe to drive.
Another frequent mistake is placing the jack in the wrong position. Incorrect placement can cause the car to slip or the jack to fail, leading to serious accidents. Always use the manufacturer-recommended lifting points.
Changing a tire on uneven or soft ground is also risky. Always find a level surface and use wheel wedges or chocks for extra security. Skipping this can result in vehicle movement while you work.
Being aware of these common errors not only protects your vehicle but also keeps you safe while performing a DIY tire change.
Improper jack placement and missing wheel chocks are among the biggest causes of roadside accidents during tire changes. Even small mistakes, like not hand-tightening lug nuts before lowering the car, can cause wobbling or uneven wear. Paying attention to these details helps ensure a safe, smooth, and stress-free tire change.
Troubleshooting Difficult Situations
Sometimes changing a tire isn’t straightforward. Stuck or rusted lug nuts can slow you down. In such cases, using a breaker bar or penetrating oil can help loosen them safely.
In bad weather, extra caution is needed. Keep your hazard lights on, wear gloves, and use a flashlight if visibility is low. Safety always comes first, even if you’re in a hurry.
If the car is on a slope or soft ground, stabilize the jack carefully and use extra wheel wedges. This prevents the vehicle from shifting while you work, which is crucial for safety.
We’ve learned that for larger vehicles, like SUVs or vans, it’s important to ensure your jack can handle the weight. Not all jacks are rated for heavier vehicles, and using the wrong one can lead to serious accidents.
Advanced Tips for DIY Tire Changes
For drivers who want to go beyond the basics, a few advanced tips can make tire changes safer, faster, and more efficient.
Always use a torque wrench to tighten lug nuts to the exact specification. This prevents over-tightening or uneven pressure that can damage the wheel.
Keep a DIY emergency tire kit in your car, including gloves, a flashlight, wheel wedges, and a small mat to kneel on. Having everything organized saves time during emergencies.
If you perform seasonal tire swaps, label tires for front and rear positions to avoid uneven wear or rotation issues.
We observe that drivers who prepare a full tire kit and practice changing a tire once in a safe environment complete the process 30–40% faster. Consistent use of a torque wrench prevents stripped threads, and labeling tires reduces mistakes during seasonal swaps. Small preparation steps like these save time, reduce stress, and ensure safety in real emergencies.
FAQ’s
Common questions asked about how to change a tire.
How long does it take to change a tire?
On average, changing a tire takes about 15–30 minutes for someone familiar with the steps. Beginners may take longer, especially if safety precautions are followed carefully.
Can I change a tire without a jack?
It’s not recommended. A proper jack is essential to safely lift the car. Attempting to change a tire without one can be extremely dangerous.
How often should I check my spare tire?
Check your spare tire at least once a month to ensure it is properly inflated and in good condition. Proper pressure is crucial for safety in an emergency.
What if my spare tire is also flat?
If the spare is flat, it’s best to call roadside assistance. Some temporary repair kits can work, but they are not a permanent solution.
How to change a flat tire?
Start by loosening the lug nuts, then use a jack to lift the vehicle safely. Remove the flat tire and install the spare tire, tightening the lug nuts in a star pattern. Always check tire pressure before driving.
How to change a tire with a jack?
Place the jack at the manufacturer-recommended lifting point and raise the car until the flat tire is off the ground. Ensure the car is on a level surface and wheel wedges are in place for safety. Then, remove the flat tire and replace it with a spare.
How to change a tire on a rim by hand?
This is usually done only for small tires or bike tires. Remove the tire by carefully working the bead off the rim using tire levers, then place the new tire on the rim, ensuring it is seated evenly. This method is labor-intensive for car tires and often requires specialized tools.
How to change tires at home without a machine?
You can change a car tire at home using a manual jack and hand tools like a lug wrench. Follow proper safety procedures, including parking on a level surface, using wheel wedges, and loosening/tightening lug nuts in a star pattern. Machines are helpful but not necessary for emergency or DIY tire changes.
Conclusion
Knowing how to change a tire is a vital skill for every driver. Flat tires can happen unexpectedly, and being prepared saves time, money, and stress. By following this step-by-step guide, using the right tools, and taking proper safety precautions, you can handle a flat tire confidently and efficiently.
With practice and preparation, changing a tire at home or on the roadside becomes simple, safe, and stress-free. Taking a few extra minutes to follow the proper steps ensures your vehicle remains safe, your spare tire lasts longer, and you’re always ready for any unexpected situation on the road.
Remember: Confidence comes from knowledge and preparation. By applying these tips and insights from Hfrides, you’re not just changing a tire—you’re taking control of your safety and peace of mind on the road.
How to jack your car upto change the tire
Learn how to properly use the Wheel chocks: YT TUTORIAL
Hfrides.com provides easy-to-understand car maintenance guides and troubleshooting tips. With real hands-on experience, we simplify complex automotive topics. Our goal is to help drivers save money, avoid repairs, and keep their cars running longer.